

I was one of the people in the latter group, continuously annoyed by people who don't understand the orders of magnitude of difference in computing power between a Redstone Computer (they are on par with 1930's technology) and a modern computer. After a fresh session of apoplectic rage however, I began to ponder: "What sort of program could you feasibly run on a Redstone Computer that would still retain the essence of Minecraft?" And thus a dream was born.
That was 3 months ago. After months of planning and sporadic construction work, I have finally completed this great and grand project which I intend to be my "Magnum Opus". I have made "Minecraft in Minecraft", or "Mini-Minecraft".
Features:
-2D Graphics!
-8x8 Pixel Screen
-64 bits of Landscape Data
-Blinking Lights!
-Directional Control Interface
-Solid Terrain
-Gravity
-Moderate Signal Latency (4,000ms)
-Color-Coded Circuitry!
And now to show that I'm not just full of ****, I give you screenshots:
Display viewed from control-box
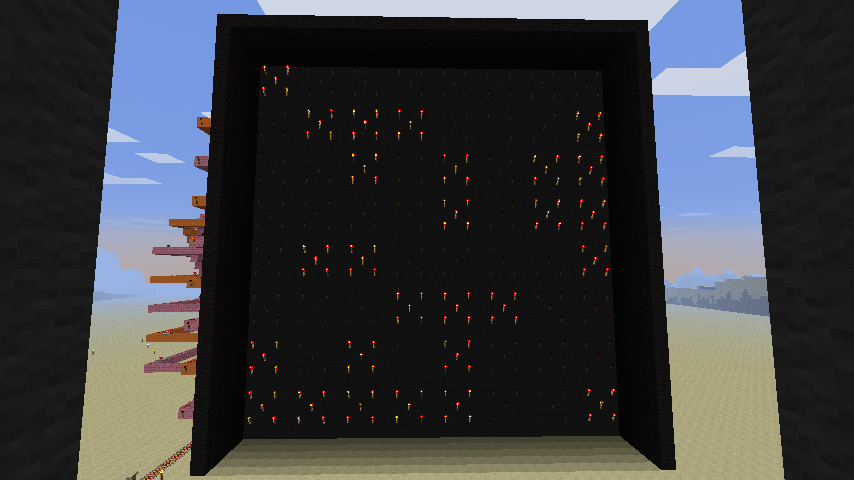
Here you're staring at the crazed mish-mash of all the terrain created/destroyed in my debugging attempts. Player position is not visible, since that square is currently OFF in its blink-cycle.
Display Side-View
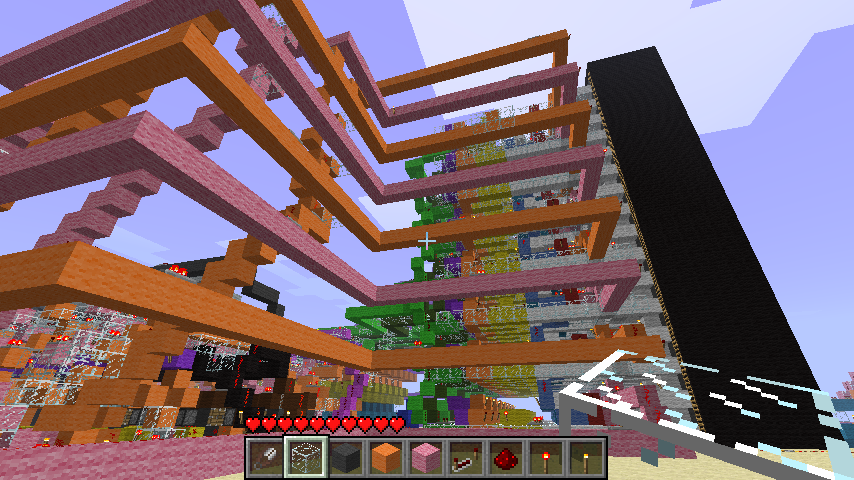
The orange and pink lines are carrying the Vertical Position data from its register to the display. The sharp-eyed will notice that there is a torch lit on right side of the middle pink line. That's the current height of the player. I placed those torches there for debugging purposes when I was having problems with data corruption.
High view of back of Display
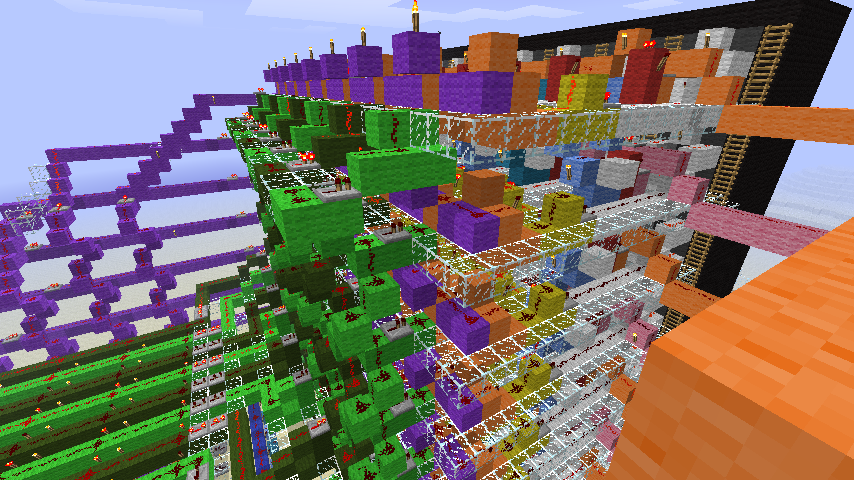
Light and Dark Green helixes carry new data to the Display, one Bit per column. Purple lines in the background carry the "Write" command to an individual Row to update its D Flip-Flops when a block there is placed or removed.
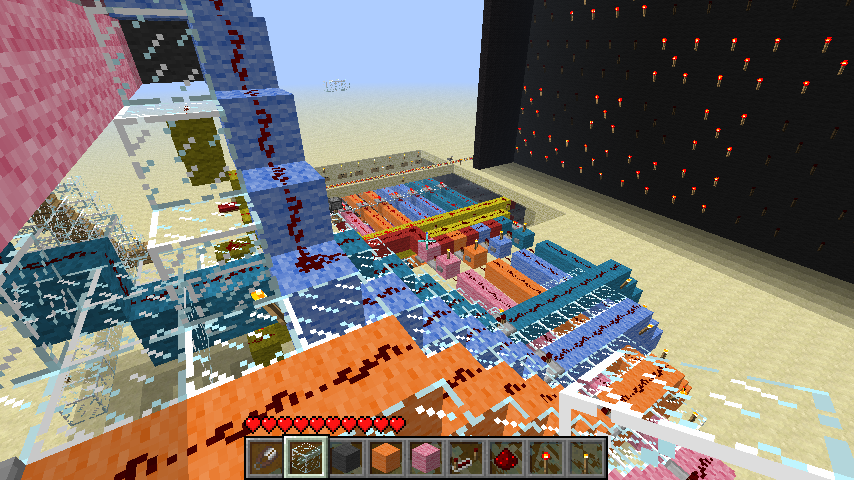
Guts of the machine
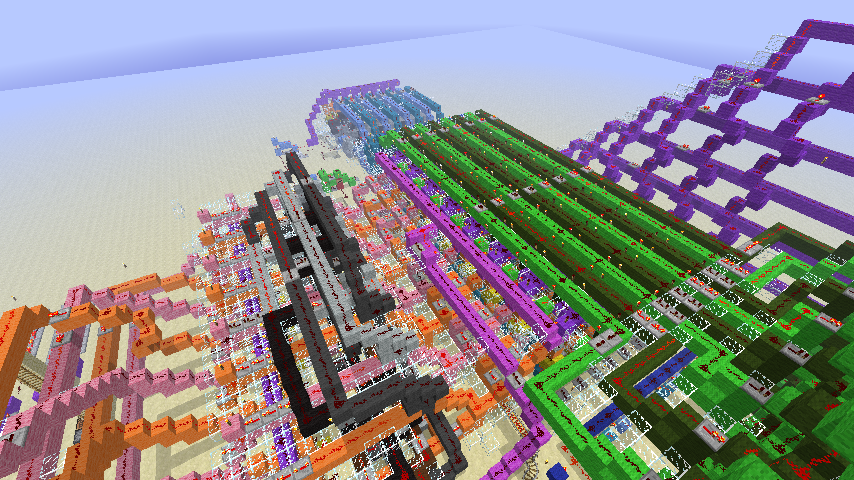
Here you see all the parts of the machine that do the actual calculations. Underneath the green lines is the 64 bits of RAM (the green lines are its input) that store the terrain information for calculations. In Blue at the far end are the Horizontal positional controls which both keep track of the player's horizontal position and govern interaction with blocks. The Gray stuff to the left is the circuitry needed for the "Jump" command, and underneath it is the rest of the Vertical positional controls.
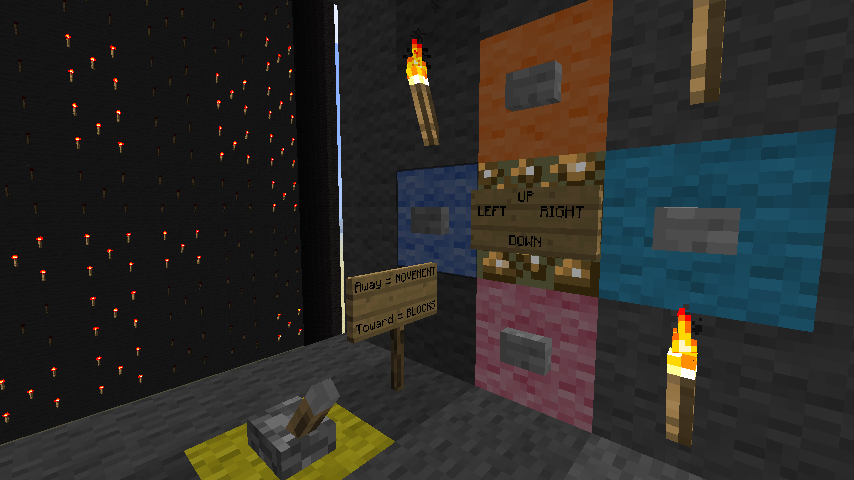
Control-Bits
Here you can see 4 of the 9 Control-Bits that govern the machine. Combining "Shift Up" with "Place/Remove Block" results in the block above your current position toggling between ON and OFF. Note the long chains of Repeaters on some lines: It was necessary to introduce carefully tuned signal-delays to ensure that the Positional/Terrain actions don't happen until they have already been pointed to the right location. Getting the signal-delays synchronized like this took many hours of frustrating debugging even after I thought I was "95% done!". Well, I'm done NOW.
Wires Leading to Command Decoder
Here you see the wires from the Control-Box going down to be converted into signals sent to the Control-Bits that actually govern the machine. Pink/Orange are Down/Up and Light Blue/Teal are Left/Right. They split into 2 lines in the decoder: one for Movement, the other for Block manipulation. The Red line is in charge of triggering an extra "Move Downward" command after every action you perform in order to simulate gravity. A solid block underneath you will prevent this downward motion.
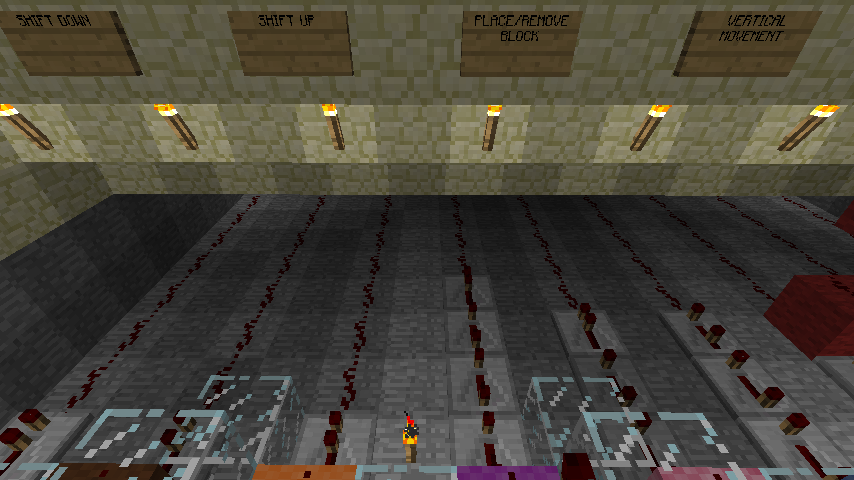
Control Panel
Here are the 5 controls that will let you move through the world. 4 directional controls and a switch to toggle between Movement and Block Placement/Removal. It's humbling to realize just how much work is required to convert a simple button-press into an executable command. It takes about 4 seconds for the effects of a button-press to be visible on the screen.
So, that's the sneak-preview of my machine.
I'm calling this a "Sneak Preview" because the real presentation is going to be the Youtube Video I'm planning on making which will show this thing in action, accompanied by mad laughter and melodrama and will get its own dedicated thread. My intention is for that video to go viral and explode the internets.
Oh, and also I'd like to give thanks to Conundromer for deciding not to beat me to completion of this project while I was on vacation, even though he probably could have if he'd set his mind to it(he's good).
If you think that "Minecraft in Minecraft" is totally awesome then feel free to +1 my Reputation. The higher it gets, the sooner my video comes out!
Edit: The video is out as of Aug 31st.
See this thread:http://www.minecraftforum.net/topic/590096-hans-lemurson-makes-minecraft-in-minecraft/
2
Anyway, for my review I'll be looking at each of the seperate areas and finally at the map as a whole. To keep track of the good and the bad more easily I'm going to be dividing the grade for each section into several parts:
Visuals: This is purely how the area looks and feels. Nothing gameplay related here, this is just about the atmosphere of the area.
Gameplay: This is also about the area design, but, contrary to Visuals, this is about the functional aspect of the area. Here I'll look at how the area plays, how well the different obstacles work and how all of the parts come together to form a nicely playable level (or how they fail to).
Challenge: This part is about how difficult the area is. More specifically, this part looks at the area's difficulty in relation to other areas nearby and at how different sections of the area scale in difficulty.
Notes: This section may be empty and is not graded. This is where I'll note things like bugs, annoyances and suggestions to fix some of these things.
Anyway, on to the review!
The start of a map is always important to dragging the player in and convincing him to play all the way through, and you did a great job at that here through visuals alone. Even though you seem to start off in a peaceful environment it becomes clear the second you look down that this is not the case - and thus the map begins. It's not just the impression at the beginning that does it though, the rest of the area looks great too. It was a good move to insert some of those patches of grass all the way down to the bottom - that made sure that the feeling you had all the way at the top doesn't disappear. The different platforms were a nice touch too, each one different from the last. The only problem I had with this area is the cave on the side with the mossy cobblestone - it didn't fit in with the rest of the area in terms of aesthetics. Some extra patches of grass in there might've helped, but I can't say for sure. Anyway, that's just a minor complaint, overall the area looks great.
Gameplay: 9
I love that gold nugget. Seriously. It's so satisfying to knock mobs off the edge with that thing, it's amazing. It's the perfect item you could've given the player for this area. I ended up regularly using it up until halfway through intersection #2. The indoor areas and the mossy cobble cave on the side also provided some nice variation. I did fall for the trap by the way, but luckily the delay you put on it was very merciful so I escaped without even taking any damage. Still a shame about the potions though.
Challenge: 7
I thought it was a bit easy, to be honest. But then again, I have played several CTM maps before so I already know what I'm doing, and this map IS meant for beginners. Some of the spawners seemed to be too easy to take out as well, many of them never got to spawn their mobs. You may want to consider setting the countdown timer to the next spawn to 0 when you place them - that way the interval between spawns won't change but they'll instantly spawn a mob as soon as you get near them, ensuring that you'll at least have to fight the mob once before you can disable the spawner. This is not necessary for all of the spawners (in fact, I'd advise against doing that) but some of them, especially the custom ones, may benefit from this. Overall the area was challenging enough though, what with the narrow walkways.
Notes: None
Supernatural Underpass
Similar to the Forge, this area looks gorgeous. The high ceiling is probably most of what does the trick, this area almost feels like it's outside. It's fairly peaceful due to the elevated walkway, which helps to create this peaceful atmosphere that I quite liked. I would've loved to see Intersection #1 on this location instead of where it is, on a brick platform somewhat higher above the grass. Oh well, can't have everything I suppose.
Gameplay: 8
Again there's plenty of stuff to choose for the player - this is one of the most important things in good level/game design, to give the player plenty of choices, be it in ways to tackle a problem or in paths to choose. Here the player may choose to farm the trees, take on the house on the side of the path or just explore the area a bit more in-depth. Even though the combat here is low, there's still plenty to see and do so the player won't get bored while going through here.
Challenge: 7
Even though there is not much combat here the combat that is here sure does count. The custom mob is suitably difficult to get past, the house on the side is not easy to tackle either and the mobs that start swarming onto the walkway when you get to the final part of the area make it so that you can't relax here.
Notes: None
Ragequit Monument
Wow, it's a large ****off cave with pillars! Eh. I'm not sure why you felt that the victory monument needed this area up front before you reach it, to be honest. It makes the monument itself, which is in the style of the preceding area, look out of place because of the large stone cave leading up to it, which is a shame since the monument looks nice in of itself. The cave really added nothing visually, and unfortunately it makes up the brunt of the area. Which leads me to my next point:
Gameplay: 6
Although the challenge was on-par with what we've encountered so far, there is really no reason to make the combat this repetetive here. You're basically fighting random mobs in a large cave for half an hour before you get to the monument for no reason. You already have the Underpass as an intermediary area before we can snuggle up inside the monument area, so why bother adding this? Well, at least there was some loot for the effort and the player hasn't fought large groups of enemies like this before, so I'll give it a pass in terms of gameplay.
Challenge: 6
This area is a bit too difficult for the player at this point. Skeletons in a large cave are too much of a threat when you don't have an ample supply of arrows yet, and it shows here. This area shouldn't take long to get through since it's only the introduction to the monument, but this place was difficult to get through even when I was making the sortcut from intersection #2. It isn't the spawners either, this cave just spawns too many mobs, particularly skeletons, to handle properly.
Notes: Add some honeypots around here perhaps? Or better yet, get rid of this place, redesign it or shorten it significantly. It's bland in all three areas and is on the edge of being more frustrating than fun.
Intersection #1
The inside of the intersection building looks nice, albeit a tad linear - some curves or rooms on the side might've helped in that regard. Also, the building looks butt-ugly from the outside. It's basically a stone cube. Ugh. The view around it makes up for that though, especially the dark grassy area way down below. The ores are a nice touch as well. Speaking of ores, the shortcut to the monument is very nice as well, it looks like a more compact version of the intersection cavern.
Gameplay: 6
I've never been a fan of going down a linear path while beating up mobs unless they're really tough mobs that require me to do something extra (see Zistonian Battlecry from Vechs' Inferno Mines) and this is no exception. I get that this area is supposed to be easy since it leads up to the intersection, but why did you not apply that logic to the area between the Underpass and the Monument? Either way, I would've liked to be able to look around this place a bit more, as it is it's just three rooms and one large room linearly connected to each other, which is just plain boring. Really, just add a couple of rooms on the side, above and/or below to explore and this 6 will become an 8.
Challenge: 6
Even though this was supposed to be easy this low grade is mostly because the three zombie spawners at the end failed to spawn anything because the area around them was aready mostly too light for any zombies to spawn.
Notes: More rooms. Do it. Also, the railway to the Monument is not lit up, so mobs can spawn on there. This may or may not be intended, but I thought I'd mention it here anyway.
Bittervine Ruins
The fact that I initially planned to build three grinders here should tell you enough about my love for this area. Everything here fits perfectly and it even sticks to the theme from before the intersection. The castly is nicely dramatically positioned in that large, open area, the vines give this area a great touch of wilderness over the Underpass's well-kempt garden feel and the interior of the castle reflects this state of neglect with the scattered blocks. Great job.
Gameplay: 10
I loved going below the path to risk my neck for some nice loot, I loved fighting the custom zombies, I loved seeing emeralds pop out of them, I loved using their own swords against them, I loved taking on the blazes, I loved it I loved it I loved it. My only issue with this place would be that random junk strewn around makes it somewhat awkward to maneuver around the blazes to dodge their fireballs, but if that's the biggest complaint I can think of you might as well ignore it. Oh, and the iron at the end was probably the best reward you could've put there to top off this area.
Challenge: 9
This was so much fun to tackle with the gear from before intersection #1, especially the castle. Everything here kept me on my toes and I loved every second of it. The difficulty spike from this place compared to pre Intersection #1 felt fair and satisfying.
Notes: Yes, all of this, in my face, blblblblblbl
Sanctuary of Arthropods
The walkways and lava pit with cobwebs looked great, but... more large, ****off caves. Wee. At least there's some cobweb and stuff thrown around this time and there area plenty of spots where I got to look at the real scenery, so I'll be lenient with the grade.
Gameplay: 7
Well, in spite of the large bland cave we had to do it in the combat here was quite fun. Probably mostly because the cave was narrower so it was a much more managable challenge as opposed to having mobs spawn on your sides when you've just cleared them out due to how wide the cave is. Cutting up the spiders in one hit was satisfying too, but... really? The area is named after spiders, but they're actually no threat at all here? I mean sure, there are many of them due to the spawners, but I never really felt that I'd entered the spiders den where I'd have to take spiders more seriously. Some cave spiders here and there might've helped instead of having them all in that one pit where they can't do anything but rub their heads against the bottom of the floor.
Challenge: 7
Somewhat easy, but plenty of random mob spawns and swarms of spiders to keep things interesting.
Notes: None
Intersection #2
Warning: ****'s going to get real from this point onwards. That's the message this area conveys and it does it well. I also really like that you can see the visual theme of the three new areas already from the intersection. Very nice.
Gameplay: Not applicable
Challenge: Not applicable
Notes: Why not use a teleporter to get from the Sanctuary to here? The minecart road is only used once since you get a shorter route between the intersections once you get there and it's really tedious to sit there for so long.
Grim-root Hollows
Again with the vines, but here they invoke a completely different atmosphere, that of an almost jungle-like place. The dirt and soul sand columns and the bushes and random logs help reinfoce that feeling. Its size, too, contributes to this atmosphere.
Gameplay: 8
Nicely up to par with what I've come to expect after Bittervine in Intersection #2. It was a bit of a shame that the randomly spawning mobs were still so much of a threat here that the wither skeletons and the leafhead mobs were kinda pushed to the sidelines, while they would've made for great enemies.
Challenge: 8
Difficult, but fair, similar to Bittervine. It's nice that the vines here are actually more of an obstacle than a help like they were in Bittervine where I mostly used them to my advantage to draw skeletons into melee range while here they mostly just prevented me from hightailing it out of the danger zone.
Notes: Perhaps some honeypots and a lower MaxSpawnDelay on the spawners? I'd really love to see those leafhead mobs take center stage here, they look cool and are fun to fight so they deserve it.
Happy fun time!
I can tolerate the huge ****off cave much better if there's a huge lake in there, but the castle didn't really look significantly different from the one in Bittervine. What gives? There's no need for a castle in the middle of a huge underground lake surrounded by ores to look only marginally different from the one in a dilapidated underground garden. A bit of a shame, really.
Gameplay: 7
The funbox was fun to take on. Okay, it was a lot of fun, but I'm stil upset that the two fleecy boxes were this close to each other. It didn't really feel like I had to put in significant extra effort to get the other one, although the charged creepers scared me to death - I was afraid that a skeleton would shoot one causing it to blow a huge hole in the wall. It's also a bit of a shame that you gave us the diamond straight away, it would've felt like more of a reward if it was buried underneath the castle so we could only reach it once we'd already gotten the fleecy box, like, in a small, well-lit mine of sorts below the castle and the lake.
Challenge: 8
A solitary funbox, some cave spider spawners, some zombie spawners downstairs and the charged creepers made this place challenging enough, to be sure.
Notes: Let us work for the diamonds, dammit!
Black Fort Asylum
Oh boy, another huge ****off cave, but this time with some obsidian! And the pillars are made of quartz this time instead of stone bricks! And the castle at the end had nether brick rims this time! Eh. I feel like this area would've worked better if it was just the building and the building was much larger since we haven't really seen a full indoors area yet. It would also have helped if it felt more like an asylum, although the cells without buttons on the inside were a nice touch.
Gameplay: 6
The funbox, the dense spawners and the shortness of the area made it so that I at least didn't tire of hacking away at mobs until I was done with the area. That's really the most I can say, there was not much interesting going on here.
Challenge: 6
The custom mobs were barely more threatening than the randomly spawned monsters, the bottom wool was insultingly easy to get and the creeper spawners between the cave and the castle didn't even trigger before I destroyed them. Eh.
Notes: None
Crypt of the Ghost Forest
Scratch what I said about the Grim-root Hollows - this is the place that feels like a jungle. The view when you get halfway through is cool too, and somehow you managed to make the buildings fit in perfectly with the dense jungle-y cavern.
Gameplay: 8
Because of the density of the foliage you're always in for a surprise and the constant stream of mobs from the unexplored lower levels of the tower kept me on my toes as well. Claustrophobically good, though I don't get why you made us fall down into the water to get to the smaller building.
Challenge: 7
The density of the foliage also meant that there were much less mobs, though the tower made up for that by providing a constant stream of the buggers. It was kinda disappointing how easy the wool in the smaller building was to get though.
Notes: None
Intersection #3
It looks fine and the color scheme fits with the area leading up to it but it lacks the "oomph" that Intersection #2 had.
Gameplay: Not applicable
Challenge: Not applicable
Notes: None
Ash-Lake Mines
More caves, though with more interesting textures this time, and an area layout overall too remeniscent of the Sanctuary of Arthropods. I liked the bouncing lava blobs, but I'd suggest making them bounce above the walkways so that the player gets to see them more clearly.
Gameplay: 7
I really liked the parkour-like area, it made for a cool challenge without being too gimmicky where a single skeleton would screw you over since there was enough light that not many mobs could spawn at all. The rest of the area had the basic "wide cave" problem I've mentioned before though, so I'm kinda torn about this area.
Challenge: 7
The custom mobs were nice and challenging and somehow the large masses of random mobs are much more fun to fight now that we have diamonds to work with. It was decent, but nothing spectacular. I did die my one death on the map here though - I stupidly tried to rush out with the wool and a skeleton knocked me off into the lava. Goodbye, sweet gear, I'll never forget you ;_;
Notes: None
The Bellowing Mountain
The start looks okay I guess, but the volcano man. Amazing.
Gameplay: 5
The blazes were too easy to take out, the first wool was way too easy to obtain, the sides of the volcano were practically mob-free (even the charged creepers didn't spawn, and a good thing they didn't too since blasting me off a mountain that high would've just killed me and since it's so hard to defend yourself properly there it'd hardly have been fair), the inside of the volcano was a death trap (you gave us ender pearls, but they don't reach and laddering or using water is almost undoable due to the large amounts of blaze spawners and the cave curving inwards as you get higher). Ugh. And I had such high hopes for this place too when I saw the volcano.
Challenge: 6
Well, at least the inside of the volcano was dangerous.
Notes: None
Cave of the Black Crystals
Another large, ****off cave, but at least there's more stuff than just the cave here this time, like structures, the spiralling part and the sound of mysterious fireworks as you enter that part of the area.
Gameplay: 8
This is the part where the large, ****off cave structure actually works, mostly because of the spawners and funboxes strewn around. I had great fun taking this place on, even though the second half was disappointing compared to the first half.
Challenge: 8
Even if you have enchanted diamond gear you can't rest easy here lest you be overwhelmed with mobs and litter the area with explosion craters. This definitely lived up to my expectations for the final wool area, even though the second half of the area was kinda weak in comparison to the first, as I mentioned above.
Notes: None
Overall
Gameplay: 7.3
Challenge: 7.1
Notes: Overall this was a nice, short introduction to CTM-style maps. Is it perfect? Is it great? No, but it has the seeds of greatness in there sticking out from the solid to mediocre baseline. This is a great map if you're new to the CTM genre but it might be boring for veterans who expect a higher level of difficulty and quality a la Super Hostile. Overall it is a solid map, the only things that really need changing in my opinion are the gamplay in the Bellowing Mountain and the visuals in the cave before the Monument. The rest of my comments are basically suggestions, since it's all fine as it is, so do what you want with those.
Another suggestion that applies to the whole map is this: Add more lore. This map is meant to have some sort of story behind it, things like the Work Clothes sets you find several times and the entire concept of the Asylum suggest as much, so why not run with that? Give the custom mobs custom names, give their drops custom names and descriptions. It requires no gameplay revisions of your map but it adds a level of depth that your players will appreciate - an iron chestplate with Thorns II and Fire Protection II means nothing until you read that it's the armor of the Forest Protector, a race of creatures that became one with the forest so as to better defend it against the humans disturbing the peace in their underground jungle paradise in their hungry search for ores. It feels radically different fighting those armored zombies from the spawners in the Forge if they're named Undead Worker. You see what I mean? Try to play with that a little bit. You don't need written books with pages of lore that nobody'll read, just seep the lore into everything from the area design (which you've already done for a large part) to the mobs you fight to the items you use to fight them. I think it'll go a long way to get people immersed in your map.
EDIT: I just realized I typed a review of 8-9 pages for a minecraft map. Wow.
4
Now, is there any specific reason he left? Did he officially announce he's taking a break/quitting? I haven't seen such a statement from him anywhere. What's the story?
1
Skylight C: Knowing how dangerous Vetches maps can be, I opted for the combat supplies. Wrong choice - I think I died three times there, with credits to the creeper spawner room. Although the loot did give me a nice edge in getting through the rest of the Upper Mines. The area you spawn in after teleporting looks cool, it really gives you the idea that you're going to go deep underground where you aren't supposed to go. Also, lava makes everything better.
Upper Mines: After the introduction Vechs drops the player straight off in a huge cavern. Not to many spawns, but considering the lava and the amount of distance you have to cover there it can be quite dangerous if you don't have any armor yet. But because I want through Skylight C it wasn't too bad. I actually stopped for a while on the road running next to the Abandoned Dormitories to gawk at the view.
Amanita Cavern: Vechs, why is this not a dungeon? The mushrooms and the darkness really made for a great ambiance - you should use them more often! The hidden coal deposit was a nice touch to the area, but I think many people will have missed it because there's too much other stuff to look at already.
Abandoned Dormitories: When I first went in here I thought that the spider that approached me would be easy to deal with since it had already lit itself on fire. I started panicking when two more came through the corridor and the first one casually swam through a lavafall. The loot I got when I killed them more than made up for it though. To be honest, I didn't know there would be custom monsters in this map when I first started playing it. After completing the Dormitories I stopped playing for a while to look up how you gave them custom loot. The result is that I am now dabbling in custom monsters as well, most of which are pretty evil. Damn you Vetches for infecting me with your evilness. Myah.
Overall the area was great for a first wool area. Not too hard, good loot (especially from the Flamevenoms themselves) and a nice 'feel' to the entire thing. The Flamevenoms felt like they really belonged there, so good job on that.
Intersection 1: When Vetches spoils you, expect bad things to happen further down the road. That pretty much sums up my thoughts on seeing the lavish palace that was the shelter there. I also got somewhat paranoid over those weird blocks in the corridor towards the Outer Darkness so I sealed that off. Only one dungeon completed, already scared to death. Also, loved the floor (even though I, like many others, didn't initially trust it)
Everforge: First off, let me praise your designing skills again. The area still definitely looks like a part of the 'mines' as we saw them in the Upper Mines, but the building sets it apart as definitely being a dungeon. Like the Flamevenoms in the Dormitories, the structure seemed to fit in, to quote Ace Ventura, "Lllllike a glllo-ve"
Witches. This area taught me to hate them. The area had a nice change of pace from the preceding areas, definitely telling the player they've entered a new level in the map. More monsters, more varied gameplay (fighting monsters on large, open platforms, in cramped rooms and narrow ledges) and the first diamond loot in the map.
The wool area was very hard, at least that's how I experienced it at this point. I do like how the Witch spawner is a subtle trap, though. It immediately draws your attention, making you turn towards it to smash it, and then an army of creepers sneaks up behind you sending you to oblivion. I was lucky enough to have a creeper reveal the fleecy box for me so I could enter it from the top, but I can hardly imagine the horrors of having to wade through this many creepers with only half-assed golden armor. But that's probably just me and being way too careful, which did cost me my life several times as you also pointed out in your DevCom.
Lower Mines: Died two stupid deaths here and wasted a clean set of armor while trying to fix the clog up on the rails. The loot was nice alright, but please don't make lag-inducing creations like that again. Also, the activator rail in the little hut there is evil.
On with the actual review of the area. The aesthetics weren't as stunning as in the Everforge, even though they were definitely more varied than there. I guess it reminded me too much of the Upper Mines.
The gameplay here was again nicely paced. First there are the surprise Skeleton Jenga's (as I like to call them), then some blazes that jump at you from the lava lake, then some cave spiders, then some more custom monsters (I have to admit I laughed loudly when I saw the Thornguard for the first time - it looked ridiculous) and finally the wool area, which I dubbed "The Minefield" for obvious reasons. Probably the most enjoyable wool from the first section of the map (up to and including Intersection 1).
Outer Darkness: The first half of the area wasn't very interesting aesthetically speaking. More caves, just with vines this time. The premade ghast farm was a nice touch, giving me the "Oh Crap" reaction before I even entered the place.
That being said, the area wasn't very hard for the amount of loot there, especially because of the premade ghast farm which came in extremely handy in the final parts of the map.
But then I got to the second part of the area. Holy. . 10/10 for the aesthetics here without a doubt.
This part was much more fun to play. The ledges here were surprisingly densely populated with mobs, if you consider all the glowstone plonked around. The wool platform at the top was fun to tackle as well, since at this point you don't really have the supplies to take a Zistykin spawner head-on yet. The spawner corridor scared the everliving crap out of me, giving me a dose of poison II for my effort. Definitely much better than the first half of the area.
Intersection 2: Nice change in looks from the first intersection, but FOR THE LOVE OF GOD ADD SOME LEDGES WILL YA.
Hane's Disgrace: This is probably my favorite area of the map, perhaps tied with Zisteau's Dumb Blast Cavern. At a first glance it looks very similar to the Everforge, but then you get to take a good look around. Even though this area is box-shaped the story and the stunning view that the glass outline on the caverns gives you made up for that big time.
As for the gameplay, the area was similarly awesome. I went "NOPE" and sprinted in the opposite direction four times here - once for the blaze swarm, once for a creeper suddenly dropping from the ceiling, once for the invisible cave spiders and once for the wool area. I was really surprised to see the Flamevenoms back here, I definitely did not expect that. The invisible cave spiders were, of course, horrifying and the gold was just mean - giving the player gold without a way to mine it. Curse you Vetches!
Mellow Caverns: Even though I was thrilled to see the mooshrooms and the mycellium at first the area didn't live up to my expectations in terms of aesthetics. The pillar in the middle just stood out like a sore thumb in an otherwise bland area.
What this area lacks in terms of looks though, it made up for in gameplay. The Battleships scared me when I ran into them while lighting up the area, and the Player Assasins (I believe that's what you called them?) quickly took my mind off the idea that this would be the brown wool. The only thing about this area that was brown was my underwear after encountering three of those wretched things upon turning a corner.
Lush Ruins: I'm not going to lie - when I saw this area I was glad I had the hint signs. As opposed to the linear dungeons you gave us before we now get a huge, open area with so much awesome stuff to look at that you forget about the funboxes everywhere. This is the first area that didn't as much feel like a part of the 'mines' of Inferno Mines but more like a completely separate area that you should only admire from a distance lest you die a terrible death.
When I first entered the area, I hated the gameplay. There was too much stuff everywhere without anything indicating I was still headed in the right direction. Everything was just way too massive. At one point I just grabbed some Sweet Lemonade and ran across the walls in the hopes of finding anything. Turns out the fleecy box was over twice as far away as I had expected. On top of that it is waaaaaay up in the ceiling, so unless you were already up high you could easily have missed it.
However, when I came back to the area later I found it to be a treasure cove of endless enjoyment for a slightly more advanced player. The lapis dungeon caves, the castles built around naturally spawned and converted mineshafts, the epic resource area in the back, the list goes on. I think this area would've fit better in the third intersection in terms of difficulty. Not because it is so hard, but because it is so long and because you can easily accidentally wander into a mini-dungeon if you're near a lapis tower.
Flame Warp: The aesthetics made me expect some kind of really bat insane custom monster here, which turned out not to be the case, but still. I liked the transition area between this one and Lush Ruins as well - I had never expected you to use a ghast like a living turret like this. Not much to say about this area besides the crazy structure except that it was a tad hard to navigate. It took me way too long to find the path to the next area - you may want to consider just giving the player a path instead of requiring them to see a hole in the ceiling and expect them to realize that's the way to go, because I sure didn't.
Intersection 3: STILL NO LEDGES
Wilhelm Cliffs: This area predominantly made me think of Race for the Wool except for the missing mirrored lane. Too bad though you didn't give us a view of this area from the side since we can hardly appreciate it from just going through it.
The gameplay here reminded me a bit of the Everforge - poking my head out of a ladderwell and hoping there is no creeper there. The two fake traps scared me (actually the first one, the only one you visited in the DevCom, didn't get me but the second one did). The Zistykins, the annoying punch-bow carrying Wraiths and Thornguards and the Super Nitro Brothers, Bam and Boom, with their loyal pet and mount Glycerin really made this area, that could have been really easy, up to par with the difficulty of the rest of intersection 3.
Salire Castle: In my mind the combination "Super Hostile" and "Castle" set off several alarm bells. I needn't have worried though, since the area was not too hard. Instead, we get a kind of gameplay I never expected to see in minecraft, a really cool-looking area and the first bossfight of the map, along with some nice side areas where we witnessed the return of the Funbox.
The jumping was really fun, and I got hit several times by monsters I attempted to deliver a Hulk Smash to. The boss was really cool (I had hoped you would give us a boss ever since I first saw the Flamevenoms, and had almost given up hope by this point) and interesting to fight with the terrain the area provided. You nailed it again in your DevCom - it did feel like a game of paintball.
Zisteau's Dumb Blast Cavern: Best area in the map along with Hane's Disgrace. The domes, the lavafall, the curvy paths, the room built in the middle of the pillar, everything looked amazing. 10/10 on visuals.
The gameplay was likewise great. At this point we have enough gear and stuff to be able to take Zistykin spawners head-on, which is exactly what I did. And it was fun. So much fun that I even pacified the fake fleecy box dome despite knowing there was just a stick there. Blowing up the room with the charged creepers and the Zistykins with a flaming arrow after getting the Death Sentence out of there was incredibly satisfying as well. After leaving this area I was still yearning for more.
Victory Monument: E-P-I-C. Nuff' said. Well worth the wait of getting there.
Unnamed Resource Cavern: I am ashamed to admit I died three times here, mostly due to the Boomers. Despite being really difficult the reward was handsome. This is also the area I'd like to credit for teaching me to just barge in there sometimes (I wasted an Unbreaking III diamond sword just by whacking away at the endless swarm of zombies coming from the gravel area.) I also have to admit that I wouldn't have thought of the stacked potions if I hadn't watched your DevCom after securing this area.
Camp Ember: At first, I was surprised to be outside. Then, the ceiling loaded in. *Slow clap*
Just roaming around this area with fire resistance for a bit was great. Random but dense groups of natural spawns, the Zombie Stacks (they are indeed incredibly fun to fight) and whatever monster may spawn from the mossy cobblestone ruins was really fun. So much that I just decided to list this as a different area from the Castle itself altogether.
Ember Castle: Oh Vetches, you and your castles. The moat made of lava and the Funboxes visible from a mile away, as well as the blazes suddenly rising up from the Hell Pond (blame me for missing the obvious spawners there) made it immediately obvious that this wasn't going to be like Salire Castle. Also, the castle made me think of a backstory for this place (check the spoiler)
Cavern of Last Respite: 0/10 stupid trap I hate you Vetches die in a fire.
(Very intimidating area and nice base and shortcut, 8/10)
Vexian Gallery: Just when I thought it couldn't get any more incredible. The cubes sticking out gave this area a weird 3D-effect, making it seem really intimidating. I like it even more because it wasn't threatening at all, giving me more time to just enjoy the epic scenery. Great job on this area.
Blackened Archive: I was worried this would be a very long and tedious area when I first saw the many floors, but that turned out not to be the case - there were effectively only 6 or 7 floors. I saw the wraiths coming though, there was no way you would make an area this high over void without threats of knocking me off.
The second part, the library, was very cool as well. I nearly got a heart attack when I was attacked by what looked like a living pillar of fire. Although they weren't very hard when I got over the shock of getting ambushed by one (I don't understand why you called this area hard in your DevCom). Definitely a nice area, especially because a random group of Chars can suddenly barge around a corner of bookshelves at any second. Like the Zombie Stacks from Camp Ember a mob of Chars is a lot of fun to fight.
As for the boss, it was definitely harder than the Salire Castle one, just because of the amount of them (and the freaking Player Assasins scaring me so much I paused the game for a second in a panic, damn you Vetches). Nice touch with the diamond armor, I made sure to use it to get diamond gear easily.
Zistonian Battlecry: The aesthetics aren't all that spectacular, but they drive home the point that this area is simple, straightforward fighting. And I loved every second of it, even when I had to go back to take the wool because I fled the area as if the devil was chasing me (which, with a crapton of nether mobs behind me and the empty Void below me is a very apt metaphor). I really love gameplay like this, which is perhaps why I enjoy Hypixels maps so much.
Eternal Battle: I really didn't like this area. It was way too chaotic. Tons of stuff swarming you before you've even cleared the second set of webs, too many spawners to take out normally and an invincible castle with crazy strong fleecy mobs made this area a nightmare, one of the kind I didn't enjoy. Aesthetically the area doesn't have much going for it either - a generic nether-like cave (although I must admit that the iron fences representing petrified vines were cool) with some random stuff plonked down everywhere - two blobs of webs with hyperactive spider spawners, lampposts that spawn blazes to give you light (or rather, to light you on fire) and random boxes and towers everywhere. All of this could have been tolerable if the castle itself had been bigger and the area had been designed differently. I would have imagined this area to have an entrance on the side, with the castle on the other end (and increased in size to cover a whole wall) with all of the other towers scattered over the "courtyard". This felt less like a siege and more like being dumped in the middle just because it made the area harder. (Also, the fleecy mobs here as well as those in the Blackened Archive were the inspiration for my backstory on Ember Castle)
Dinnerbone's Arena: As I approached this place, I knew it wouldn't be as easy as just fighting a boss one-on-one. The invisible endermen proved me right. Once I made a shelter for the constant endermen attacks (crappy quality screen makes them almost impossible to spot) I was lucky enough to have a Dinnerbunny fling itself at me willingly. The fight itself disappointed me somewhat (two hits with a diamond smite IV sword? Really?) the drops were hilarious and the area overall fun.
Codewarrior's Castle: More castles. Yay. After the time it took me to find it despite knowing the directions I hoped it'd be worth it - and it was. Instead of enderpearling in I decided to challenge it from the front gate. Probably the most fun I've had in an area since the two Zisteau-themed areas, confirming my belief that Lush Ruins is way more fun for more advanced players (since this castle was essentially a harder version of the ruins in the rest of Lush Ruins). The boss was, once again, too easy, not in the least because of the lack of a flame bow, allowing me to shamelessly melee him. Again though, the area itself made up for it.
Lost Caverns: Nice little nostalgic area to get through, a bit like a cross-breed between the first half of the Outer Darkness and the Upper Mines. With witches. The boss area itself looked very nice and epic, and I prepared for a long struggle, but Kamyu just came running right out of the fortress, saving me the trouble of having to pass the ghasts. I would've liked this area to be more like the transition area between Lush Ruins and Flame Warp - a central ghast turret with some rooms around it that have some surprises in there (some kind of new stacked monster or something), a bit of lapis-class loot and finally a crapton of Kamyu Clones all the way in the back. Still, it is always fun to kill a special mob, especially when it's named.
Overall: The map was well-paced for the most part, stuck to its theme in terms of looks (except for the Eternal Battle) and had tons of new mechanics and challenges to throw at the player. Most of the other things have already been said in the reviews of the specific areas, but there's one more thing: I'm very glad you didn't put too many traps in this map. It really allowed me to take in the full brunt of the new mechanics and gameplay you threw at us. Magnificent map and keep up the good work!
1
1
Alternatively, play it in singleplayer and note the coordinates of the gates that lead back to Doc Scratch's appartment for each world and walk back to the starting point. You can see the coordinates by pressing f3, they show up at the top left of the screen in the format x=largedecimalnumber, y=largedecimalnumber, z=largedecimalnumber stacked above each other. You only need the x and z coorinates though, since y just determines the height of the player which you probably won't need unless the gate isn't on the ground but in the air or underground.
Also, this is the most awesome thing ever. Downloading!
1
Oh what the heck just have some more